Hello Bitlanders!! Today I would like to share to you; How to use Photoshop Actions. I’m not saying I’m a Photoshop expert but I guess I just enjoy it that much I just have to say something about what I really love doing. Yes. "I JUST LOVE PLAYING WITH PHOTOSHOP". I hope you would find this interesting.

Image source: https://pixabay.com/en/photoshop-logo-symbol-adobe-icon-1065296/
My first encounter with this feature was terrifying but at the same time, exciting. I wanted to learn more about what Photoshop Action can do and so I went to youtube. Although I’ve learned a lot from various video tutorials on how to apply effects, I’ve had difficulty finding the Photoshop Actions I want, and so I’ve decided to make one for myself. My first Photoshop Action was about converting a photo into digital painted portrait; my very own Photoshop Action. Although there are a lot of free downloads of Photoshop Actions out there, I would choose to make my own because free Photoshop Actions are very confusing to use especially when somebody else made them. Mastering my Photoshop Actions makes it more easy to use rather than using someone else’s work.
What is Photoshop Action?
Photoshop Action is one of my favorite features in Photoshop. It is a tool which contains recorded sequence of applied filters, effects, and styles which can then be played in just one click. For example, if I would want to make my photo into a “vexel cartoon” photo, I would just click on the play button and Photoshop will automatically render all the effects, all in just one simple click.
Video Credits: Jennai via Bitladers
Before

Image Source: Jennai via Bitlanders
After

Image Source: Jennai via Bitlanders
With Photoshop Actions, I can easily manipulate any photo I want. I can change a simple photo into a piece of art, perfect in all angles.
Why Use Photoshop Actions?
Photoshop Action for automating effects

Image source: https://pixabay.com/en/businessman-finger-touch-turn-on-2956974/
Of course it is much easier and fun to do the same thing especially when it’s automatic. Imagine a television with no remote control, I mean, can people really live without automating everything? Even in isolated areas where there is less access in technology, they too have their own way of automating tasks. And that is since human beings like us are highly intellectual that we tend to expand our knowledge in order to make things even better. As for me, doing repetitive tasks are just exhausting and not fun at all plus the time I’ll waste on making the same thing over and over again; does not make me creative.
Photoshop Action saves crazy amount of time

Well I guess I really hate taking too much time in work. With Photoshop Actions and its capability to render effects with just a click; very helpful with regards in time saving to avoid frustration thereby reducing stress. Oh yeah!!
How to Use Photoshop Actions?
When I first started making a Photoshop Action, I was really unsure if it would work for me. I guess it was like knowing things without conscious reasoning. It was kind of a “trial-and-error thing” because I was new to this with all the confusion, anxiety and fear but, well “Sometimes you have to learn how to run before you can walk”. I was kidding; got that from a movie I watched, Iron Man.
Photoshop Action Palette
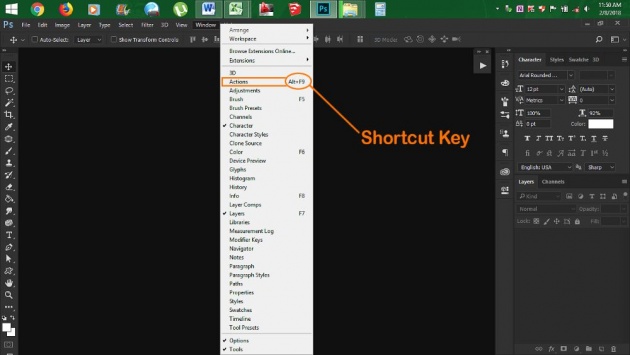
In the Windows tab located at the top row of Photoshop Interface there is a menu tray that would appear when clicked. There is also a shortcut key “Alt+F9” which can be used to save time; that’s if you’re in a rush. I haven’t really used this shortcut because I’ve arranged my tabs for easy access. Yep! I can customize my Photoshop user interface. Working with Photoshop really is challenging especially if you’re not familiar with the basic shortcut keys though. First shortcut keys I’ve learned were for erase, brush, and marque tools. I might just write a new blog for this.
Credits: Jennai via Bitlanders
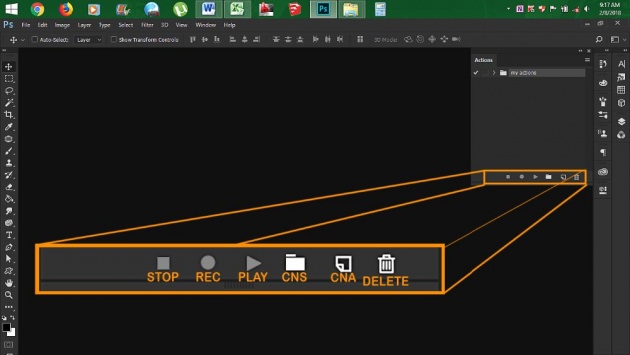
Anyway, after clicking on Actions, a Photoshop Action Palette will appear as presented in the photo below.
Photoshop Action Palette can be opened by clicking the Windows Panel of Photoshop. It has six buttons at the bottom;
(1) Stop- used to stop recording Photoshop Actions
(2) Record- used to start recording Photoshop Actions
(3) Play- used to start Photoshop Action
(4) Create New Set (CNS)- used to organize new sets of Photoshop Actions
(5) Create New Action (CNA)- used to automatically create new Photoshop Action
(6) Delete- used to remove unnecessary Photoshop Actions
Credits: Jennai via Bitlanders
I’ve found out that I just need to click on the record button of the Photoshop Action palette which enables Photoshop to record the effects I apply in a photo.
I wrote down everything I need to record in a piece of paper so I would not skip a step. After that I would just need to click on the stop button to quit recording and then Photoshop would automatically save the action. It is that easy. Here comes the thrill part; testing.
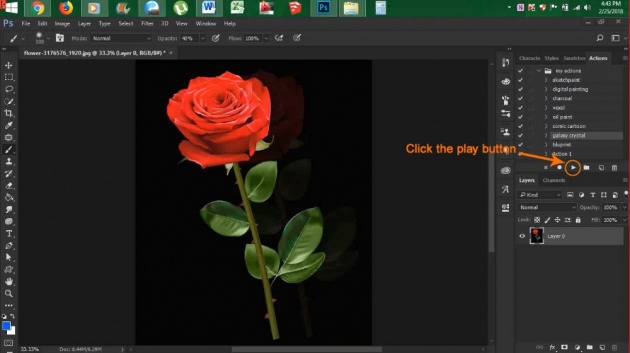
I was excited to see if all the effects I’ve recorded works, so I closed everything and started opening the same image I used, clicked on the play button; there it was. And then I conducted an experiment with my actions to different images; I was amazed by how the effects rendered perfectly with just a few tweaks of adjustment.
Credits: Jennai via Bitlanders
Credits: Jennai via Bitlanders
With Photoshop Action, making art is easier. Although I use to draw traditionally, I’ve appreciated digital photo manipulations so much because it’s automatic and helps me save a vast amount of time.
Photoshop Actions
As time goes by, I have made varieties of Photoshop Actions; charcoal effect, digital painting, sketch-paint, vexel cartoon, comic cartoon effects, etc.
Before

Image Source: https://pixabay.com/en/flower-rosa-plant-nature-leaf-3176576/
After

Credits: Jennai via Bitlanders
With this I have earned online with some freelancing sites like Fiverr. There are still a lot of things I need to learn though. Photo manipulation is just one. Using Photoshop Actions, manipulating photos and creating new designs is just so easy; all I need to worry about is conceptualizing an idea for a new design.
So there it is. I hope you enjoyed reading. I’ll be to making more blogs about Photoshop in the coming days. Till next time. In the meantime, here is a Querlo Chat for you.

