Image credits: Background by ractapopulous via Pixabay.com
I had trouble grasping the bujo concept at first—which almost discouraged me from trying—so I hope this post will be of help to anyone who's interested in keeping one, but is feeling overwhelmed and isn't sure where to start (all the more if you're a little bit like me, harbouring somewhat vague notions such as 'I don't dare to start writing in that pretty notebook because I don't want to ruin it, so I have to be extra careful and not botch anything at all').

Image credits: March cover page by buffy noken via Aminoapps.com
I'll illustrate this post with excerpts both from my own journal and from other bujos: mine isn't particularly 'pretty'—while I do some calligraphy, I don't take particular care of illustrating every single page—but I want to show that you don't need to have the Prettiest Journal In The World for this to be worth it. You can enjoy bullet journaling without your notebook looking perfect.
Rapid logging
As mentioned in my first post about bullet journaling, rapid logging is the key concept here. By keeping it to short entries and 'bullet lists', it becomes easier to see if a task remains to do, if you've partially or fully completed it, or if you had to push it back to another day. There's no need for well-built sentences or any traditional journaling here, and this will allow you to keep your planning to a barest but efficient minimum.
To help you start with this, I'm going to break it down into its detailed components.
Image credits: Rapid Logging by Hillary Yeager
Index
The Index is where you list all your pages and sections. While it's very easy to find the information you need at first, once your bujo starts growing, you'll want to know where exactly your pages for the past month are if you need to refer to it for some reason, or where you left that list of ideas for stories you want to write.
I suggest not filling it too long in advance, but monthly: if you decide to add a few pages between one month and the other, you don't want your index to be already filled for the whole year, and having to insert ugly scribbles between existing lines.
Here's an example of a simple Index containing not only a list of months, but additional pages: a list of reading goals, blog post ideas, and so on.

Image credits: Bullet Journal Hacks via BohoBerry
Another component worth adding right after or before your index is the Key: a list of symbols you're going to use throughout your bujo to mark down your tasks. For mine, I use tick boxes for tasks (crossed out once Completed, with a bullet for Cancelled, or arrows for Migrated). Events and Appointments get their own symbols, as well as Deadlines, which are tasks that I cannot migrate (such as uni assignments).
These symbols are extremely useful for Rapid Logging, so make sure to choose Keys that you'll easily remember!
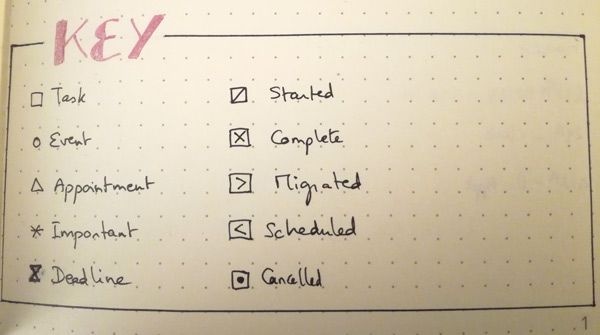
Image credits: Naotalba via bitLanders
Future Log
The future log consists in a couple of spreads (usually 3 months per page) that let you see at a glance the most important events planned over the year.
You won't use it for daily scheduled tasks such as studying, house cleaning, work shifts, etc. Keep it for important events only (this concert in November, or that optometrist appointment you had to schedule four months in advance and can't afford to miss).
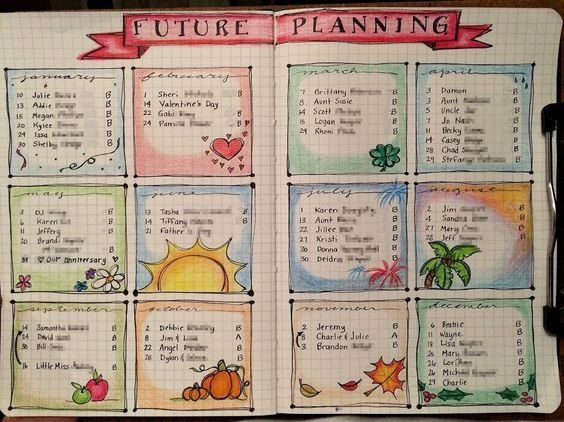
Image source: Future Planning by aseknc2 via Pinterest
Example
Here's a video showing the use of Index, Key and Future Log—as well as providing a few simple ideas regarding titles and calligraphy.
Video credits: Index, Key & Future Log Pages! by Kaitlin Elizabeth via YouTube
Monthly log
Now this is where you get to really plan. The monthly log lets you see at a glance the most important tasks planned for the next four weeks or so. Here as well, skip on the daily, repetitive tasks (I assume you do remember that you have to work or go to school on a regular basis), and only write down THE one important task or event for each day.
Example
A 2-page monthly log. On the left, all the month's days with the one most important task for each of them. On the right, a list of personal goals that you want to keep aiming for throughout the month, such as exercising daily and eating a balanced diet.

Daily (or weekly) log
The original bujo website mentions a Daily Log, however this part is also pretty flexible. Some people are happy with one page per day; I prefer to use a 'weekly log', to be able to see the whole upcoming week all at once.
Example
My days tend to have fixed tasks, and I don't need more than a few lines to note down everything. Work, for instance, is quite straightforward—I can't really organise my day in advance, so I don't have to plan it hour by hour. As for my studies, each of my tasks takes 1-2 hours, and I can't plan 20 of them in a single day anyway. This weekly spread is therefore quite simple.
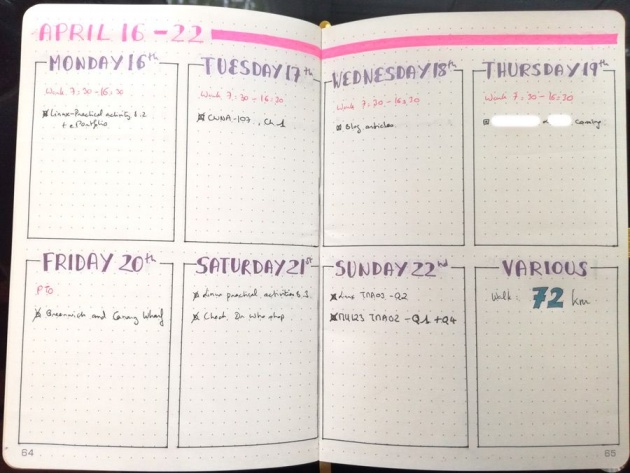 Image credits: Naotalba via bitLanders
Logging tasks
In the image above, you can see the tasks I marked as completed (with an X), and one that had to be cancelled (marked with a bullet point). My work shifts are also noted down—they're all the same for this week, but sometimes they vary. I use colours to set them apart from the rest.
The way I planned it went as follows:
- Work: Easy, I just need to check my shift in our office's calendar, then note it down.
- Studies: With 1-2 hours per task, I know I can plan for one on work days. I do that 1-2 days before I want to complete each task, not too long in advance: if I finish faster than planned, then I can add another task the next day. Once completed, I cross them out.
- Cancelled task: People who were supposed to visit on that day—noted down because I was happy about it, and had to remember to be home on time—but who had to cancel at the last moment. So I marked it with my 'bullet' Key for 'cancelled'.
- Other tasks, such as going to Greenwich (on foot, so I knew it'd take more time than just getting on a bus). Here's even a picture, as proof!

Image credits: Naotalba via bitLanders
- Various: This is a 'fits-all-ends' box, where I note down how much I've walked on a given week; this is part of my tracking for exercise-related goals. Sometimes, I also doodle in that box.
This particular spread doesn't contain rescheduled events. I don't know when the one I had to cancel can be rescheduled, so I'll add it as a new event later, when it can finally be. Had I known, I would've marked it with a ' > ' on that Thursday, then added it as a new Task to the next week or the next month.
For a bit of perspective, here's a completely different daily log idea:
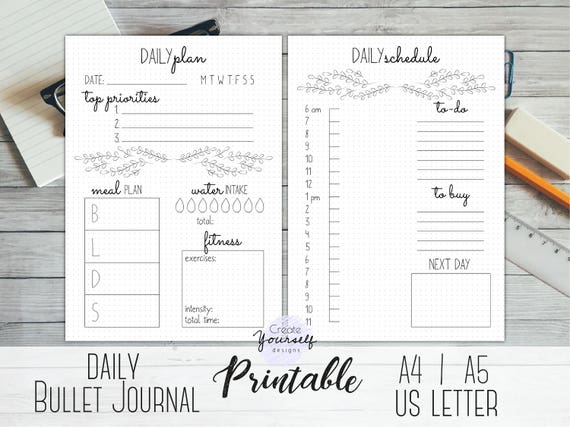
Image credits: Printable daily planner by CreateYourselfShop via Etsy
Other types of logging
Rapid logging is the basic method; you can add other ones, such as trackers that help you set habits. These can be charts, boxes to colour once you're done... anything that strikes your fancy, really.
The following video offers planning ideas. This vlogger spends a little time before the month starts to properly illustrate her journal, which you don't have to do if you don't feel like it, but the trackers are definitely useful for setting regular habits: all those little things that are so easy to forget (and we all know that noting them down on sticky notes doesn't work, especially when the sticky notes pile up and become part of the scenery).
Video credits: Plan With Me | May 2018 by Erin Elissa via YouTube
And here we go! I hope this has given you some more ideas about how to approach bullet journaling.


