If you want to capture great images using your DSLR(Digital Single Lens Reflex) you need to know the basics of photography. First of all what is DSLR(Digital Single Lens Reflex)? According to wikipedia.org "is a digital camera combining the optics and the mechanisms of a single-lens reflex camera with a digital imaging sensor, as opposed to photographic film." Many people now a days own a DSLR but doesnt know the meaning of DSLR.
Many People today use a point and shoot camera, but many own a DSLR camera but does not know the basics, they don't know how to compose an image, use the proper exposure they only have an super duper expensive DSLR hanging on their neck. Having the most expensive DSLR does not make you a "Professional photographer", sometimes you don't need to have an expensive camera, all you need is a camera, your hands and your creative eyes to capture great images.
So in our first Lesson in Basic Photography Im gonna teach to you the 3 basic things to use when capturing great images, we call this the Holy Trinity in Photography.
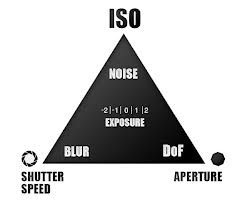
3 things you need to capturing great images, The ISO, Shutter speed and the Aperture.
So what does these 3 have in common? that is light. All three of these controls the amount of light that will go into the camera. Changing these 3 setting will either make your images underexposed, overexposed or picture perfect :)
Let's take a look at these 3 settings :)
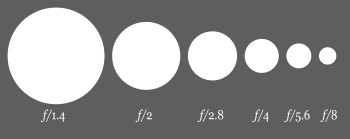
1. Aperture - It is an opening which light travels. The Aperture is measured in F stops, the smaller the value of aperture(ex f1.4) meaning the larger the opening, meaning more light will enter the camera's sensor and the oposite follows, the larger the number of F stop (ex f/8) the smaller the opening, means less light will enter. Larger opening is used when you want your background to be blurred and your subject to be on focus, we call it "depth of field". In low light situation, you need to use a larger opening so that more light will enter.
So when do we use large F stop numbers or small opening? We use that when capturing landscapes like nature, group family picture. The reason why we use a small opening is that all of the pictures in the images will be sharp, not out of focus.
2. Shutter speed - According to www.wikipedia.org " shutter speed or exposure time is the length of time a camera's shutter is open when taking a photograph." Shutter speed is displayed as 1/100s.
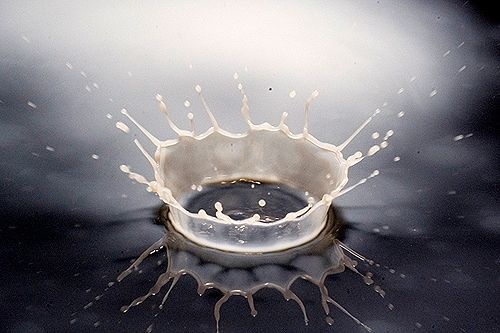
Setting the camera's shutter speed is very important. If you want to capture a water droplet, you need to have fast shutter speed in order to capture the image.
If you want to have a dramatic photo, you can use a slow shutter speed. Here is a great example of a slow shutter speed.
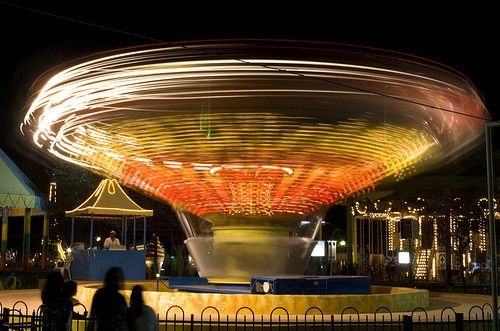
The consequences of using a slow shutter speed if yourusing it hand held, is that your picture will be blurred, because your hand will get shaky because of the slow shutter speed. To capture these kinds of photo's without shaking, you need to use a tripod. Tripod is very stable and you can get your shutter speed as low as .3 seconds without getting a blurred shot or shaky shot.
3. ISO - According to http://digital-photography-school.com/iso-settings "ISO (or ASA) was the indication of how sensitive a film was to light. It was measured in numbers (you’ve probably seen them on films – 100, 200, 400, 800 etc). The lower the number the lower the sensitivity of the film and the finer the grain in the shots you’re taking."
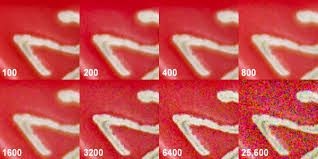
Here is an example of images taken with iso 100 to 25,600. As you can see from iso 100 to 1600 the image is still clean, but when it goes to 3200 to 25,600 iso noise grains become to pop out.
Right Aperture+Shutter speed+ISO = GREAT IMAGES
Practice these 3 setting with your dslr camera, use manual mode and remember keep practicing every single day.
Don't forget to share & buzz. Happy shooting everyone :)

