Hey guys!! I'm back with my favorite Mobile App, recently I've been sharing my favorite editing Apps here in bitlanders. And with an overwhelming review from Ms. Hillary, here I am again to share one awesome Mobile Application that I love to use.
So you see, I am a frustrated Artist who is kinda low-tech. So I maximize my editing skills up to my extent. (Still not that good but hey, atleast I am having fun editing my works as I enhance it.) As I was entertained to edit my Time-lapse Photography, I also love to enhance my Calligraphy and watercolor piece. You can check out my blog about my Timelapse Calligraphy edit here: Quick and simple video editing using filmoraGo app As much as I had fun writing or painting, I also had fun editing my works and one amazing App that accompanied me is Adobe Photoshop Express.
Photo Credits: Yannn via bitlanders.com
Snap. Edit. Share. Smile.
Add some sparkle to your in-the-moment photos, and then share them with friends and family.
I am a frustrated Adobe Photoshop editor since then. The very moment I discovered such Mobile App, my heart races so fast and wanna scream “Finally!!!”. I discovered Adobe Photoshop Express last 2014, I was still in college at that time and haven't found my craft. So when I finally learned how to do calligraphy, I searched for this app again and decided to use it. I've tried other Applications for photo editing too. There's Aviary (which is a product of Adobe also), Picsart and many more but I guess we have our own preferences and we use these apps for specific reasons. Now back to the app, allow me to share the beauty of this app and why I love it so much.
Video Credits: Awais Mirza via youtube.com
I believe we all have our own preference when it comes to editing our photos. As for me, I wanted people to feel the emotion of my photo, to add flavor or simply enhance the photo itself. I'm no photographer, so most of the photos I edit are just my Artworks. I'm not gonna lie, but if you are an aspiring Artist, I am pretty sure that you've dreamed a beautiful Instagram account to showcase your works. Maybe not for the likes or for the audience but to greatly present your works.
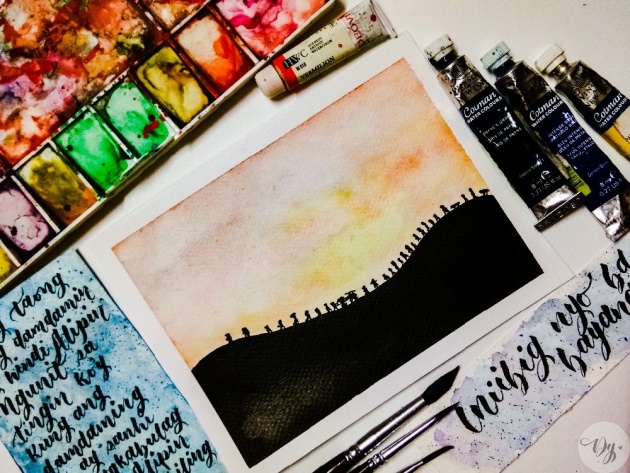
Photo Credits: Yannn via bitlanders.com
This is my latest Artwork edited in Adobe Photoshop Express. Inspired by surreal cinematography from the movie Goyo: Ang Batang Heneral.
Commercial Break: I've been fond of landscape watercolor since then so whenever I saw a stunning landscape photo, I really wanted to try and paint it. It's been two weeks since I saw the movie Goyo: Ang Batang General. I've been inspired how magnificent Sir Jerrold Tarog made the cinematography of the film. UGHHHH. To give you insight, here's the official trailer of the movie.
Video Credits: globeph via youtube.com
Haven't seen it yet? Catch it up at your local cinema now! Surely worth the watch! (Stay tuned on my next blog it will be all about this movie)
Back to the reality, here's a quick run through of the app and how you can maximize its feature. This is my step to step process of how I edit my photo.
• Lights and Filters •
Creativity at your finger tips.
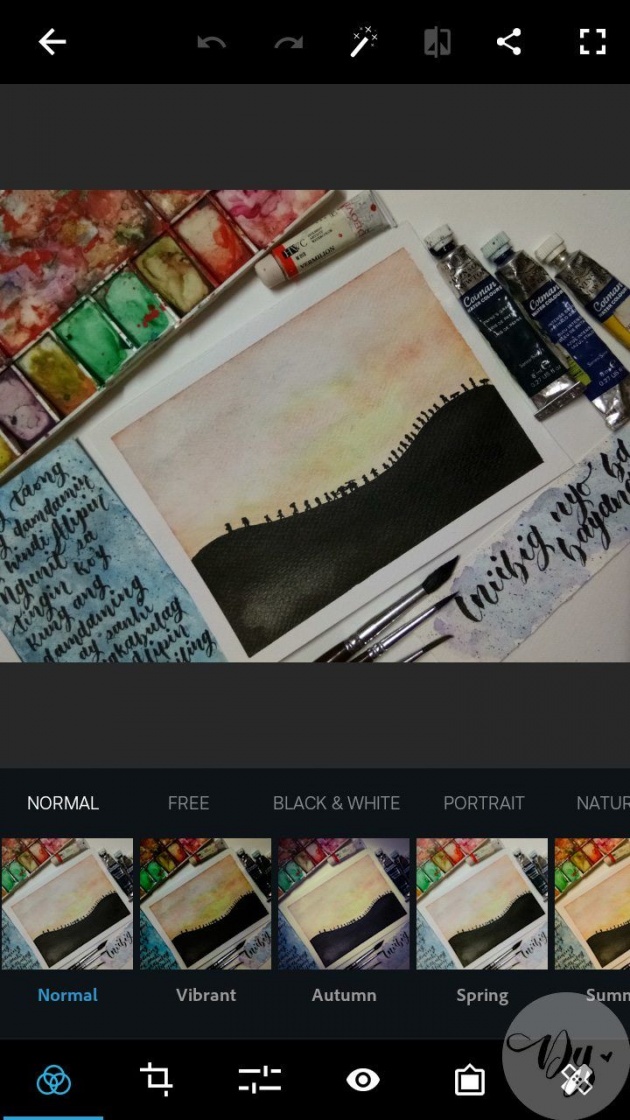
Photo Credits: Yannn via bitlanders.com
This is my usual edit tools in this app since the lights in our house are kinda dim, editing app is my savior to give justice to my work. I usually click the Auto Enhance to add up some light in my work and Vibrant Effect to make it more lively. These two are my ultimate combo when it comes to editing. I love both of this feature because it lightens up your photo and doesn't distort it.
But aside from the vibrant effect, there are several effects or filters you can choose from. Well there are categories based on the scene you wanted to portray, such categories are:
• Free Effects - filters included in this categories are Autumn, Summer, Spring, Winter, Invert, Bueno, Pastel, Haze, Koi, Aquatic, Misty, Dappled, Dream, Superpunch, vivid, glow and contrastpunch effect.
• Black and white - Of course, the classic Black and white effect is always present, filters includes classic black and white, silvered, carmine, memory, pinhole, sepia and much more effect.
• Portrait - such effects are vignette glow, orton, vignette blue, vintagell, 3D, Nostalgic, Soft, Gleam, and more.
• Nature - such effects are cinematic, classic, colorful, twilight, verve, grain, fake and much more.
• Splash - with these effects your photo can be colored as aqua, blue, green, magenta, purple, red or even yellow.
• Duo-Tone - last but not the least category of filters is duotone, it has effects such as red tint, green tint, blue tint, brown tint, dawn, salmon and more.
There are tons of filters you can choose from right? Surely there will be one that will fit the emotion of your photo. Prepare for the next editing feature!
• ASPECT - ROTATE - TRANSFORM •
After deciding what effects or filter, might as well you need to fix your photo with these features.
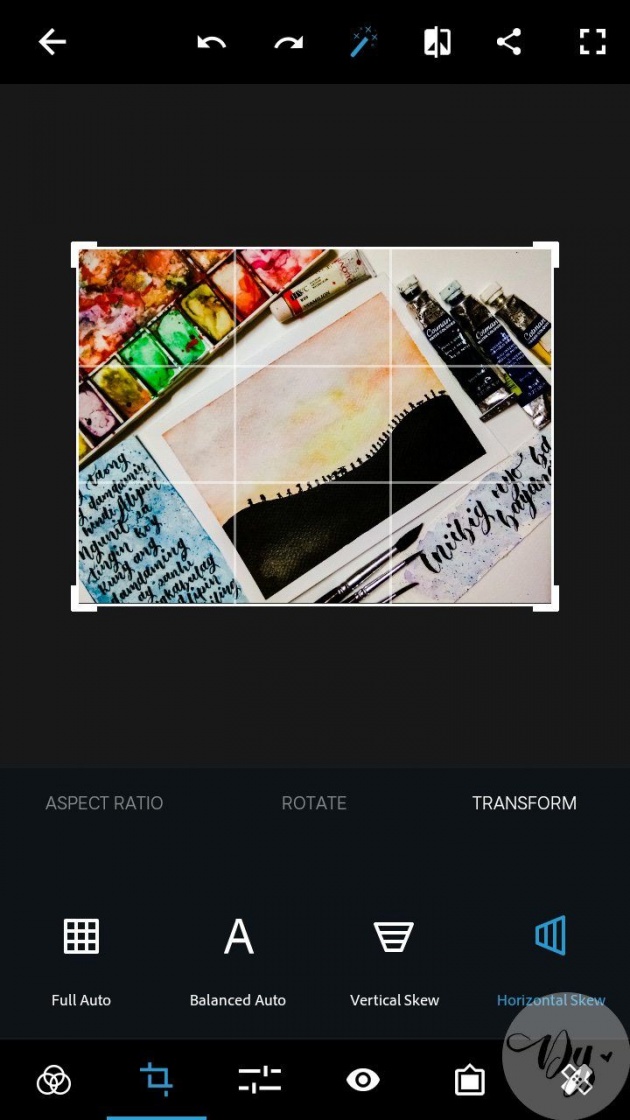
Photo Credits: Yannn via bitlanders.com
Cropping is the removal of unwanted outer areas from a photographic or illustrated image. The process usually consists of the removal of some of the peripheral areas of an image to remove extraneous trash from the picture, to improve its framing, to change the aspect ratio, or to accentuate or isolate the subject matter from its background. Depending on the application, this can be performed on a physical photograph, artwork, or film footage, or it can be achieved digitally by using image editing software. The process of cropping is common to the photographic, film processing, broadcasting, graphic design, and printing businesses.
-Source: Wikipedia.org
• Aspect - Here you can crop your photo on your designated size. There is a free crop, original size, phone size and 1:1 size. There are also cropping features that fit in your social media such as Facebook ads, facebook cover photo size, Instagram size, Twitter profile picture, youtube icon, Pinterest, , and more standard picture size.
• ROTATE - sometimes we cannot help but capture a photo in a wrong angle. For example, it should be landscape but you captured it in a portrait style, then rotation is what you need. Also, you can straighten your photo using the app. Aside from that, you can also flip vertically or horizontally your photo.
• TRANSFORM - Ah! This is one of my favorites, as I mention on my previous blog How do you write your blogs in bitlanders? this feature helped me to straighten, full auto (form your photo equally), balance the photo and adjust the view of the photo vertically Skew or Horizontally skew.
• BASIC EDITING TOOLS •
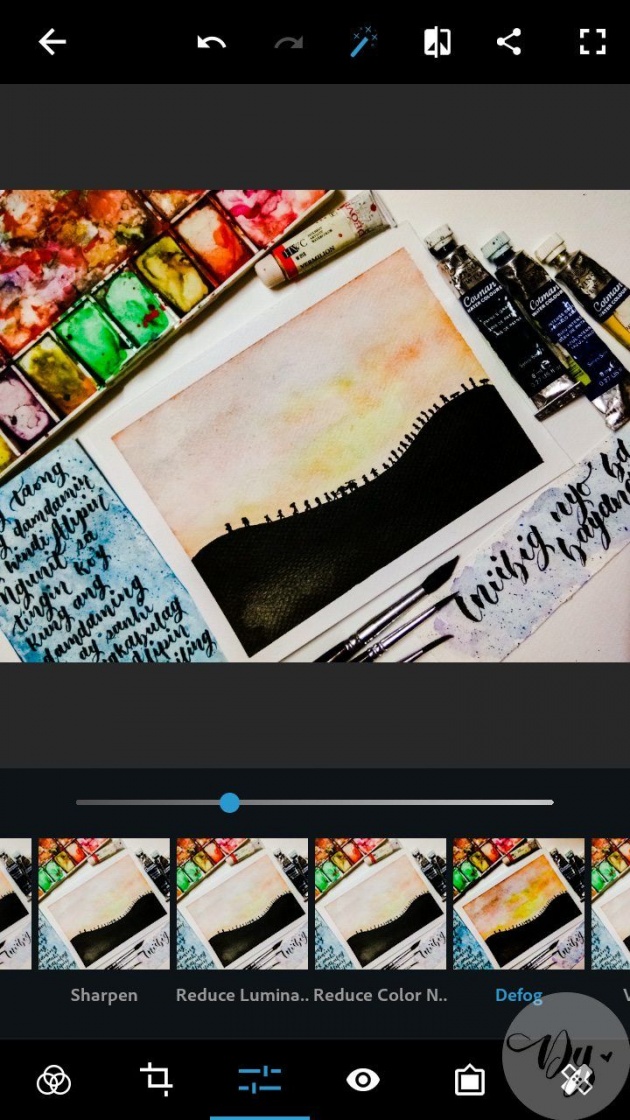
Photo Credits: Yannn via bitlanders.com
So, here are the basic tools we need to edit our photos. If you are not fond of filters, might as well these basic tools will help you enhance your photo.
• Clarity - Admit it or not but sometimes we took a beautiful shot but kinda blurry, then this feature is for you.
• Sharpen - I used to confuse myself with clarity and sharpness because they are both used to see the photo in a clear vision. The only difference is using sharpen will change the texture of your photo, it will look rough all in all.
• Reduce Luminance/Color Noise - basically, this is to make your photo look like fewer blemishes. Haha!
• Defog - this will make your photo release the darker side of your photo, more likely it strengthens the hue of your photo.
• Vignette - use this feature and your photo will have a circular border either white or black frame.
• Fade - I love using the fade effects when I wanted my photo to look vintage and kinda nostalgic.
• Exposure - basically this feature will brighten your photo not just too much because it will overexpose your photo. Hehe
• Contrast - Contrast in photography is the visual ratio of different tones in an image
When editing a photo’s contrast, the goal is to either increase the contrast to make an image more exciting and dramatic or decrease the contrast to make an image more ethereal and soft. Luminar makes it easy to make such adjustments, with a variety of presets and filters that include specific sliders to adjust Tonal Contrast or Color contrast.
-Source: skylum.com
These are just some of the tools that are usually used for basic editing. Phew. If only I could tell you all of them one by one, it will be great if you discover it yourself.
• PET EYE - RED EYE •
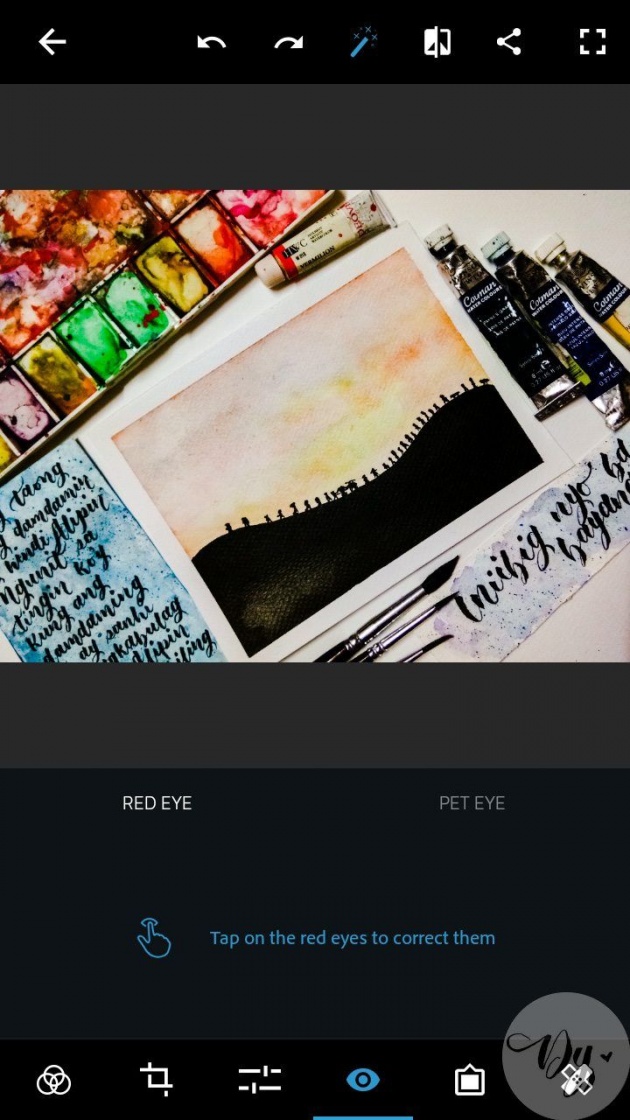
Photo Credits: Yannn via bitlanders.com
The red-eye effect in photography is the common appearance of red pupils in color photographs of the eyes of humans and several other animals. It occurs when using a photographic flash very close to the camera lens (as with most compact cameras) in ambient low light.
-Source: wikipedia.org
To be honest, I haven't tried using this feature yet. Maybe because I most of my photos don't have a red eye so there's no need for me to use the said feature.
• FRAMES AND BORDERS •
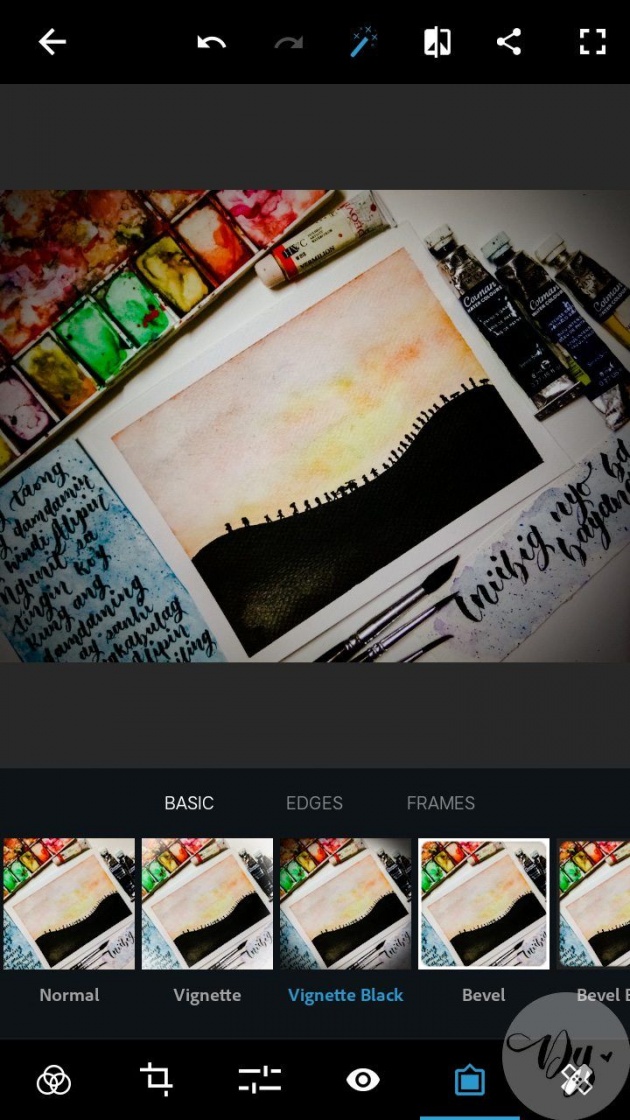
Photo Credits: Yannn via bitlanders.com
I was so late to discover this feature, or maybe because I am not fond of putting a border in my photos? Either way, I guess some of you wanted to add some border in your photo so here's a run through with it.
• BASIC - Basic borders have a vignette, vignette black, bevel, bevel black, thin, thin black. There are also basic shape borders such as Black and white circle, Vertical and Horizontal Strip, Vertical and Horizontal Border, snapshot and film.
• EDGES - Edges borders have film emulsion, rough edge, halftone, dragged, soft edge, and edge stroke.
• FRAMES - frames have matte, modern frame, wood, dark wood, bleach wood, modern matte and many more.
Last but not the least, before saving your photo especially if it is for your Craft, you might as well want to put your own watermark for you to have all the credits.
• ADDING WATERMARK THEN SAVE •
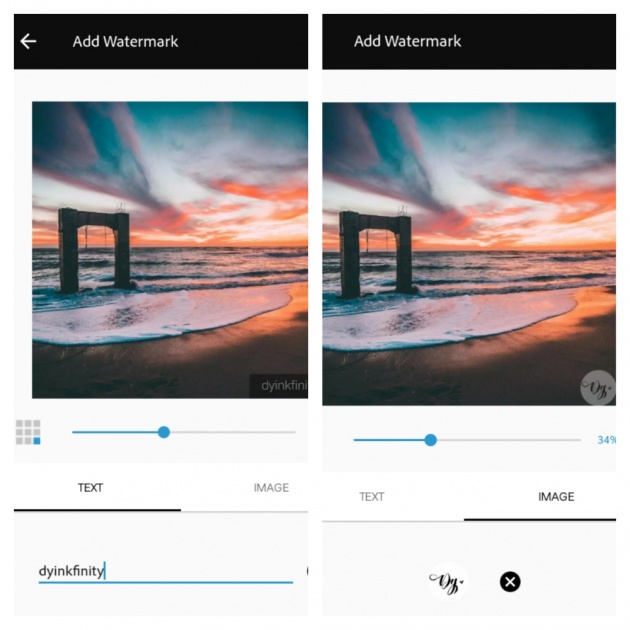
Photo Credits: Yannn via bitlanders.com
I've also mentioned this on my previous blog as I edit my photos for my blog in bitlanders but allow me to tell you guys again, adding a watermark is one of my favorite features in this App. Well, it's you're decision if you want to add one or decided not to have on.
A watermark is an identifying image or pattern in paper that appears as various shades of lightness/darkness when viewed by transmitted light (or when viewed by reflected light, atop a dark background), caused by thickness or density variations in the paper.
-Source:wikipedia.org
In adding watermark, you can choose if you wanted a text or a photo of your own. Also, you can decide the where corner you wanted to put your watermark. As for me I chose a photo made by yours truly and placed it in the lower right corner of the photo. I think that is where Artist basically put their watermarks. Also, you can adjust the visibility of your watermark, so I decide to have it in 50% to have a kinda fade effect and for it not to ruin my photo.
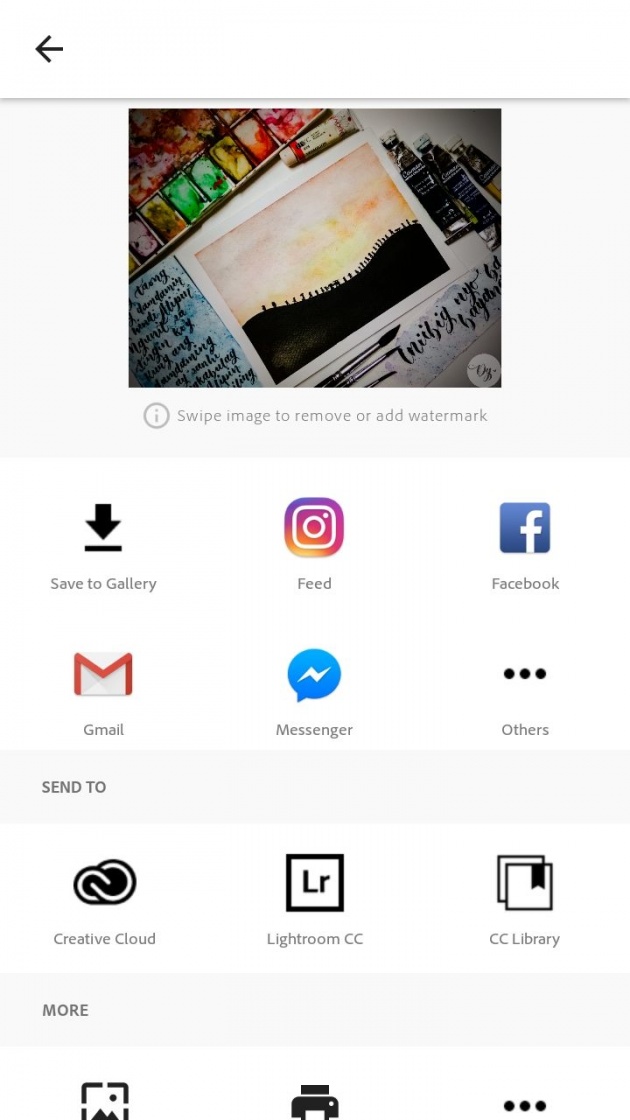
Photo Credits: Yannn via bitlanders.com
Then last and final move is to SAVE your photo. You don't want to put in vain all your works and ideas as you edit your photos right? You can save it with your watermark or you can swipe it to the left to save your photos without a watermark. And of course, you'll have the choice to share it on your social media accounts.
Here's another piece similarly to my latest work mentioned earlier, the photo ad edited using the said Mobile Application.
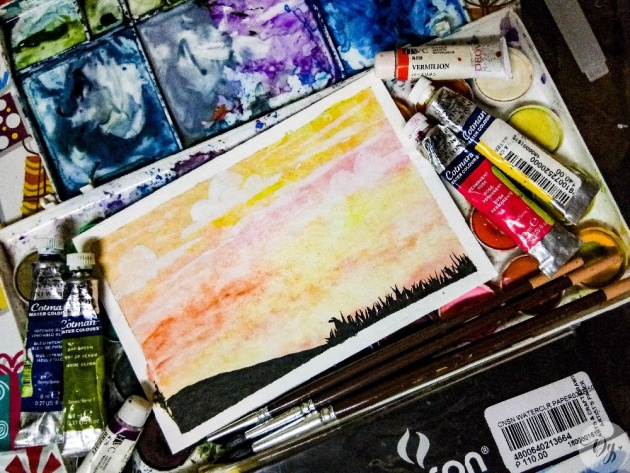 Photo Credits: Yannn via bitlanders.com
Then there you have it!! A quick run through of one of my favorite Photo editing app called Adobe Photoshop Express. I hope y'all learn and got something from my blog.
Have a great day everyone!
-Yannn

