Working with Photoshop is so fun to do and there is so much to explore. Hello Bitlanders! Today I want to write another blog about Photoshop. Apart from making my own customized Photoshop Actions, I also like making Photoshop Layer Styles.
Image Source: Jennai via Bitlanders
In this article, I want to share about what a Photoshop Layer Style is, as well as the advantages of using Photoshop Layer Styles, and how to make your own Photoshop Layer Style.
What is Photoshop Layer Style?
Photoshop layer styles are varieties of effects applied in a layer in Photoshop. It is basically used to modify contents in a layer.
Photoshop Layer
Photoshop usually works with "layers", that's the term used when you are working in Photoshop, just like in Excel where we use "sheets", or Microsoft Word where we use the term "page".
Photoshop layers are found at the right side of its user interface. I think that is the default settings of Photoshop. It can also be found under the Windows Panel of Photoshop.
Layers can either be a text layer, a video file, or mostly, a photo.
Layer effects are compiled in a set which is used to modify a layer in Photoshop. To access those effects, just click on the "fx" icon located at the lower right corner of the Photoshop User Interface as seen below; clicking that would reveal the blending options or Photoshop effects I want to apply.
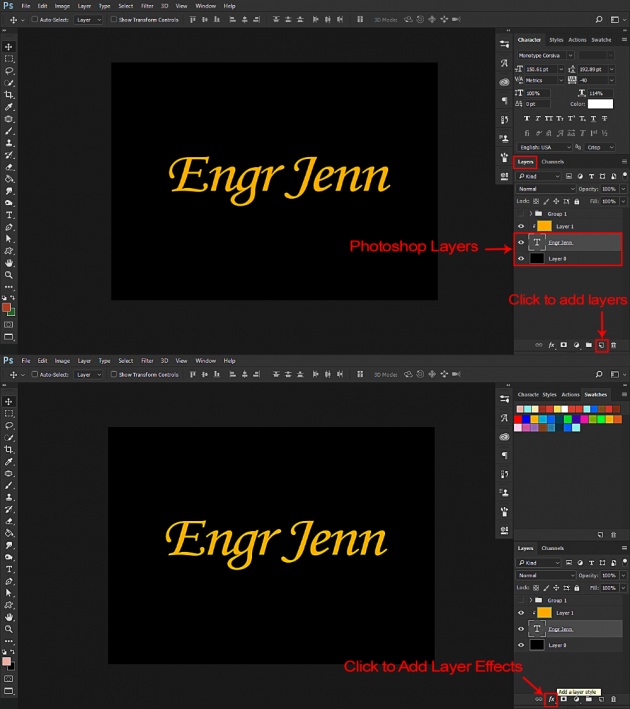
Image Source: Jennai via Bitlanders
How to Make a Customized Photoshop Layer Style
In this tutorial, I will make a gold text effect in Photoshop and save the layer effects in Photoshop Layer Styles.
Opening Photoshop CC
I've set my Photoshop to open the user interface without opening a new blank document as default. I intended to do this so I can create a choice on whether I'd be opening a file from my computer or make a new document.
To set up my choice of preference, I would just go to Edit, under the Edit tab in Preferences and then I would just select on the General and uncheck the Options box which states (Show "Start" Workspace When No Documents are Open).
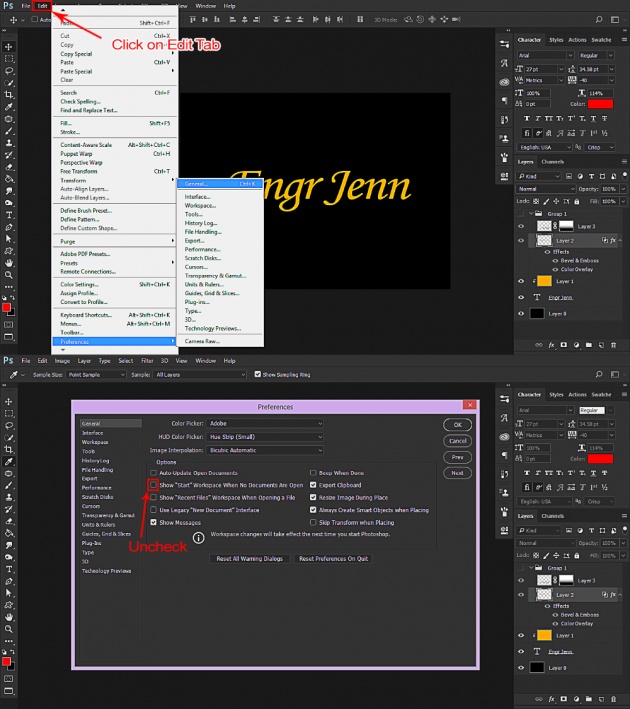
Image Source: Jennai via Bitlanders
After setting up my workspace, I can now start my work directly in its user interface and double-click anywhere if I want to open a file or click "CTRL+N" on the keyboard if I want a new blank document.
"T" for Text Tool
After creating a new blank document in Photoshop, I would just click on the letter "T" on the keyboard to change my cursor into a text cursor and then clicking anywhere on the document would create a text typing tool wherein I can type a word.
In this tutorial, I used my name "Engr Jenn", and then after typing the word, I would just press the "Esc" button on the keyboard to exit the text typing tool.
Resizing the word is easy in Photoshop, I would just press "CTRL+T" on the keyboard and a box would appear surrounding the word as shown. Moving the cursor to the upper right corner of the box and click and hold the Shift key would resize the text in proportion by dragging the corner up or down to the desired text height.
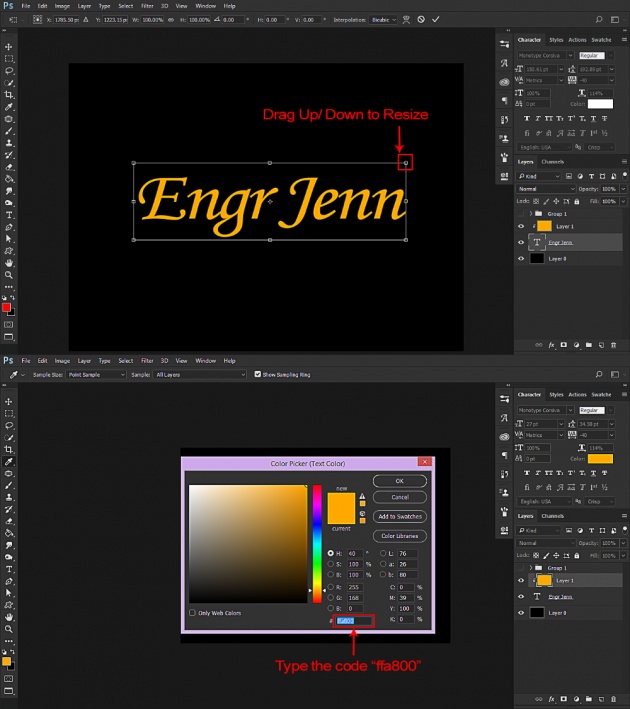
Image Source: Jennai via Bitlanders
And then I've selected a color for the word and this is the code "ffa800".
Applying Photoshop Effects: Gold Text Effect
By clicking the "fx" button on the lower right corner of the Photoshop user interface, I can create and select what effects I would like to apply.
In order to get a gold text effect, there are only two effects to use.
Color Overlay
Set the Blend Mode to normal and the opacity to 100% and then I just clicked on the color box beside the Blend mode and selected the color with the code I've provided before "ffa800", just in case I forget to choose a color for the text, I decided to include color overlay effect in my Photoshop style.
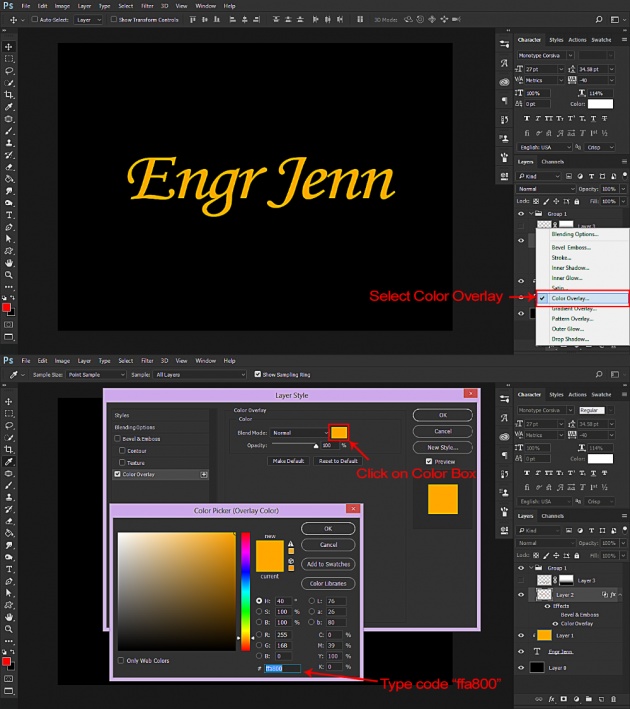
Image Source: Jennai via Bitlanders
Bevel and Emboss
After I'm done with setting up the Color Overlay effect, next thing I did was click on "Bevel and Emboss". I've set up the Style to Inner Bevel, The Technique to Chisel Hard, Depth to 501%, Size to 32%, Highlight Mode to Screen with the opacity of 75%, and Shadow Mode to Multiply with the same opacity of 75% as shown below.
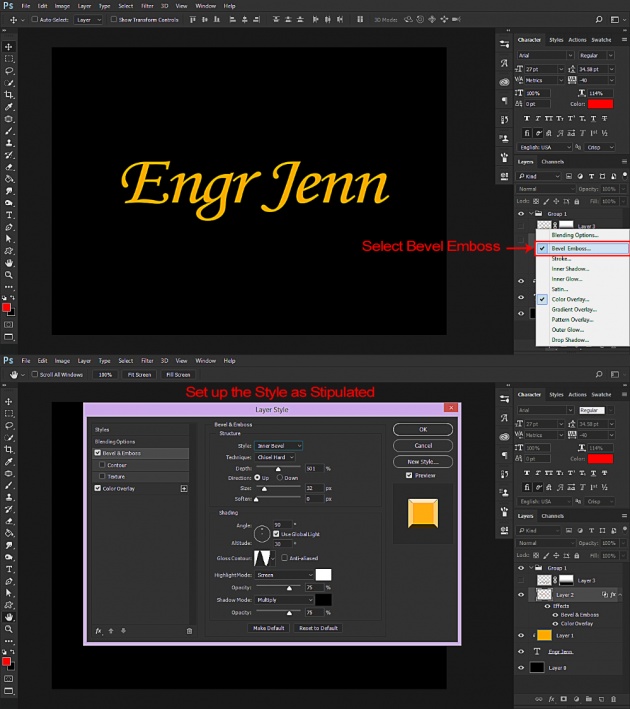
Image Source: Jennai via Bitlanders
It's that easy. After I'm done with my gold text effect, I duplicated the layer and flipped it vertically. Then I dragged the gold text down and used a layer mask and gradient tool to hide a portion of the gold text and make it look like a reflection as shown below.
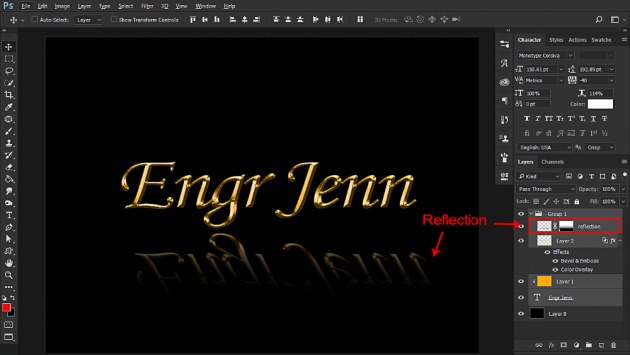
Image Source: Jennai via Bitlanders
Saving the Photoshop Layer Style
Making Photoshop Layer Style is easy. Just apply the effects in a layer and then to save the effects, click on the "New Style" button on the upper right corner of the Layer Style Window.
After clicking the "New Style" button, I can either rename it or click "OK", it will then close the Layer Style Window.
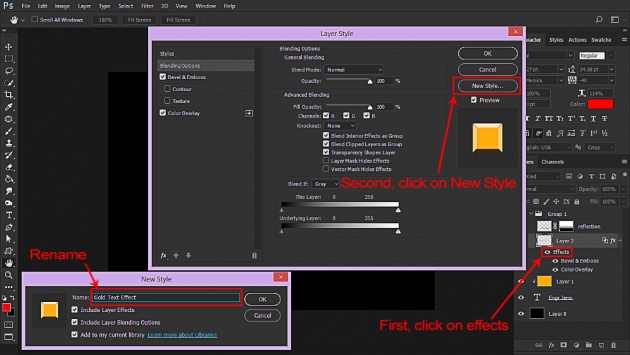
Image Source: Jennai via Bitlanders
To check the newly saved Photoshop Layer Style, I would just open the Window Panel again and click on Styles. It would then open another window named "Styles", navigate and a brand new Photoshop Layer Style is on.
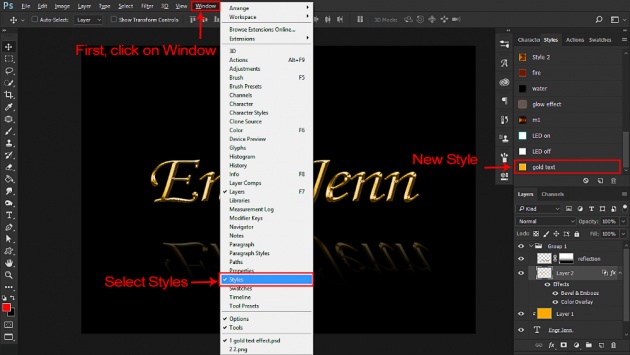
Image Source: Jennai via Bitlanders
Now that I'm done making my customized gold text layer style, I can do a test with other fonts and several words I may have in mind and just click on my saved gold text layer style to automatically render the effects to any written words in Photoshop.
Advantages of Using Photoshop Layer Styles
Photoshop Layer Style Saves Time
When a project consists of lots and lots of layers that I just want to apply my layer effects on all of those layers, these Photoshop Layer Styles saves me from the trouble of applying the same effects over and over again. It helps me save time thereby allowing me to do multitasking without worries.
Photoshop Layer Style is Convenient
It’s so easy to use that I can just choose what style I want from my collections and click on it. I can also duplicate the style I applied in a layer by holding the "alt" key on my keyboard; right click then dragging the effects to the other layer as shown below.
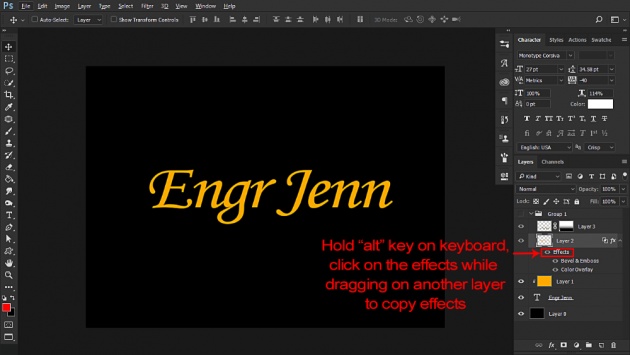
Image Source: Jennai via Bitlanders
I hope you enjoyed reading. I will write more about what other things I might share about my Photoshop journey in the coming days. Until next time! :-)
Video Source: Jennai via Bitlanders
Also, feel free to read my other blogs about my hobbies:
Making GIF (Graphics Interchange Format): A Web Animation with Photoshop CC
My Online Shopping Experience and How to be a Good Online Shopper
How to Use Photoshop Actions with Photoshop CC
Making Customized Mug Design with Photoshop CC
Developing a Hobby: Succulents are Awesome
Here’s another Querlo Chat for you.

