The USB flash drives or memory sticks are an excellent way to store and carry data and applications for access on any system you come across. With storage spaces already reaching 256 gigabytes, nowadays USB drives are often larger than past's hard drives.
Thanks to increased storage capacity and low prices, you can easily store all your personal data on a tiny, easy-to-carry, USB memory stick.
The USB drive is a device that is used by almost everyone today. However, there's a downside…
I think you’ll agree with me when I say:
USB sticks are easily lost or stolen.
Aren’t they?
However, in today’s post I am going to show you how to use your USB drives without fear of being misplaced.
If you are not aware, the leading cause of data breaches for the past few years has been the loss or theft of laptops and USB storage devices.
However, USB flash memory sticks are generally treated with far less care than laptops, and criminals seeking for corporate devices could cost your company a million dollars loss by stealing just a $12 USB drive.
By throwing light on the threats of USB drives, I’m not saying that you should never use a USB memory drives. Rather…
...I’ll introduce you a way to use your tiny data storage devices securely.
Losing USB flash drives wouldn’t be so concerning if the criminals were not granted immediate access to sensitive data stored in it.
Instead of relying merely on passwords, it's essential for businesses to safeguard their data by encrypting the device.
Yes, it is easy to create an encrypted USB drive in Ubuntu so that, at least you could rest easy after the loss of a USB drive knowing that your data is secure.
So without wasting much of your time, let’s get to know how to create an encrypted USB drive in Ubuntu.
Getting Ready
Before you can actually encrypt your USB flash drive in Ubuntu, you need to install the cryptsetup utility on your Linux system, which could be easily done by executing the following command:
sudo apt-get install -y cryptsetup
Once installed, insert the USB flash drive you’d like to encrypt into your computer, but make sure that everything that is on the drive is backed up!
Because, the encryption process requires your USB flash drive to be wiped, and anything currently on it will be lost if the drive is not backed up!
Encrypting the USB drive
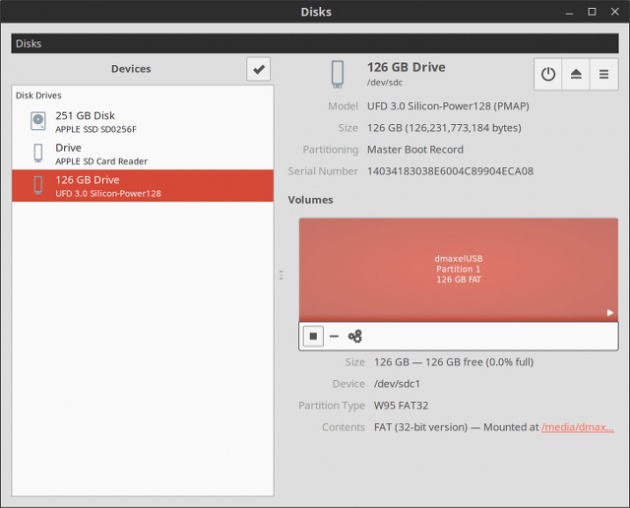
Once you made sure that your drive’s contents are backed up, plug in your USB drive and open Disk Utility from the Dash.

Now, select your flash drive from the list on the left side and click on either the Stop button or Unmount partition icon present just below the highlighted partition.
Next, click on the Gears icon present in the same line and then choose “Format”. You will get the following window:
You can choose either quick or slow Erase options (although slow erase is technically safer), and then make sure to choose “Encrypted, compatible with Linux systems (LUKS +Ext4)” in Type.
Further, you can type a name for the flash drive in the Name field, set a password of your choice for it and click on Format.
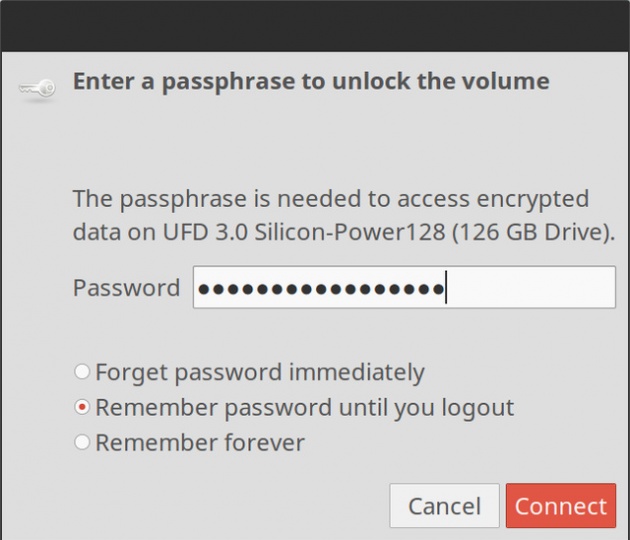
The format process may take some time depending on your selection of Erase option. Once completed, pull your USB flash drive out and re-insert again. You will see the following prompt:
Congratulations, you have successfully encrypted your USB flash drive.

Look it’s that simple to create a secure USB drive on Ubuntu.
Now every time you plug your USB flash drive into a Linux system, it will ask a password to get unlocked, allowing you to use it just as easily as before.
Now if you lose your flash drive, your content is safe as no one will be able to access it without running Linux and knowing your secure passphrase.


